How to Set Up DACs on Windows and Improve Your PC’s Sound: A Step-by-Step Guide
From: Vitor Valeri
A headphone hobbyist for over 15 years, he founded the Hi-Fi Hub website and is an administrator of the "Fones High-End" and "Fones Low-End" groups on Facebook.
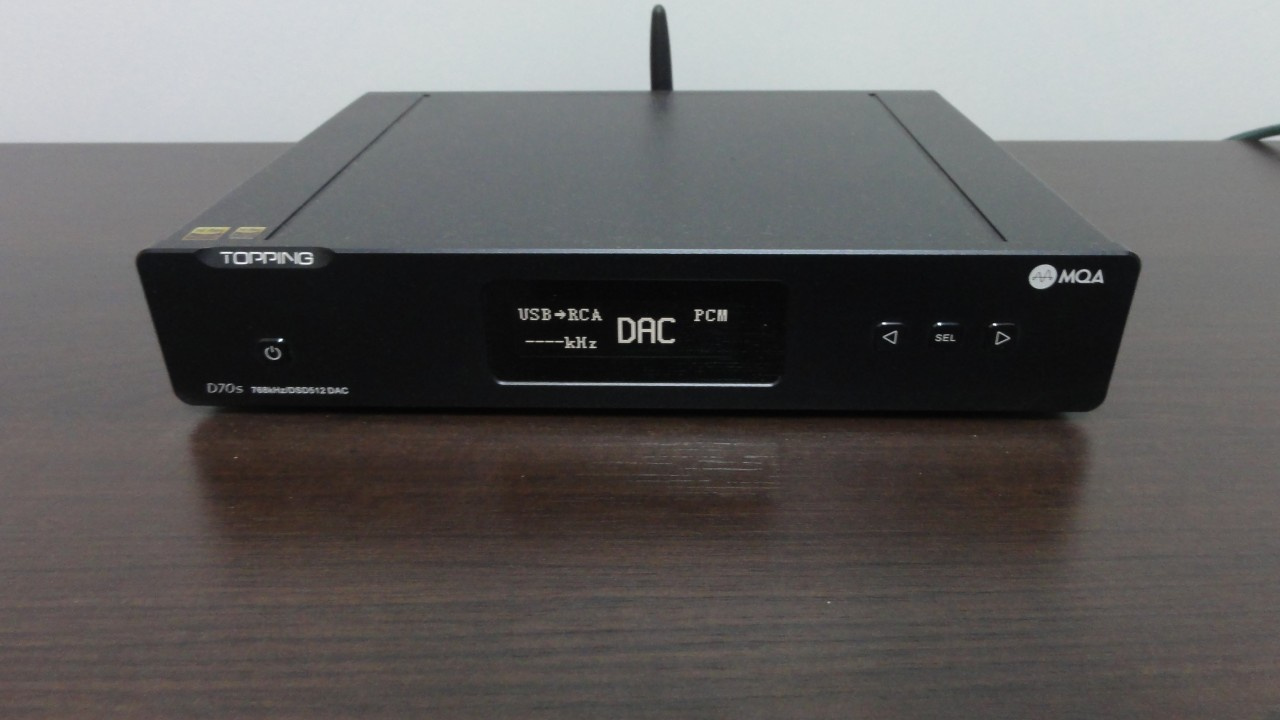
How to Set Up a DAC on a Windows PC - In the photo, a Topping D70S (Image: Vitor Valeri/Hi-Fi Hub)
When purchasing an external DAC to be used via USB on a PC, it is possible to significantly improve sound quality compared to the audio output provided by the computer’s motherboard sound card. There are several advantages to making this choice; however, you can extract the maximum performance from your audio equipment only if you know how to configure it properly. For this reason, I had the idea of creating a step-by-step guide.
What are the advantages of using an external DAC instead of the PC’s sound card?
Using an external DAC instead of the PC’s on-board sound card, whether on a desktop or laptop, can provide several benefits for audio playback. These include:
Reducing or eliminating potential noise perceived when connecting wired headphones to the 3.5 mm, 4.4 mm, or 6.35 mm outputs of an external DAC.
Improving headphone sound quality through lower output impedance, higher output power, and a power supply that is less prone to noise.
Greater flexibility to connect different devices via RCA and XLR outputs, as well as optical, coaxial, and USB inputs, allowing, for example, a computer, a smartphone, and an active speaker to be connected simultaneously to the external DAC.
Visual access to information being sent from the PC to the DAC through a display, making it possible to view the sample rate of the music before the digital data are converted into an analog signal. Some models use LEDs with different colors to identify this information.
Precautions to take before connecting the external DAC to the PC
It is important to take certain precautions before connecting your external DAC to the PC. These include:
Plugging the DAC’s power cable into a properly grounded outlet.
Using high-quality shielded cables whenever possible.
Checking the outlet voltage (127 V / 220 V) before connecting the power cable.
The DAC package does not always include all the cables you need, or the included cables may be of low quality and lack shielding. Look for this information in the manufacturer’s manual and also at retailers if you decide to purchase shielded cables separately. Search for shielded RCA, XLR, USB, and coaxial cables, as well as a shielded power cable, which is often overlooked.
It is also important to verify whether your residence has proper grounding and whether the outlet you are using is grounded (i.e., includes a ground wire).
What should be done after connecting the external DAC to the PC?
When connecting your external DAC to the PC for the first time, you should:
Check the DAC manufacturer’s website to see whether a driver is available for installation on Windows.
Access the Windows audio mixer (audio controller) and open the properties of your external DAC to adjust output settings.
Verify whether there are specific driver versions for your DAC model or a universal driver designed for multiple models. Driver installation is important to enable direct access from applications to the DAC, without interference from the operating system’s audio mixer.
To access the Windows audio mixer, follow the steps below:
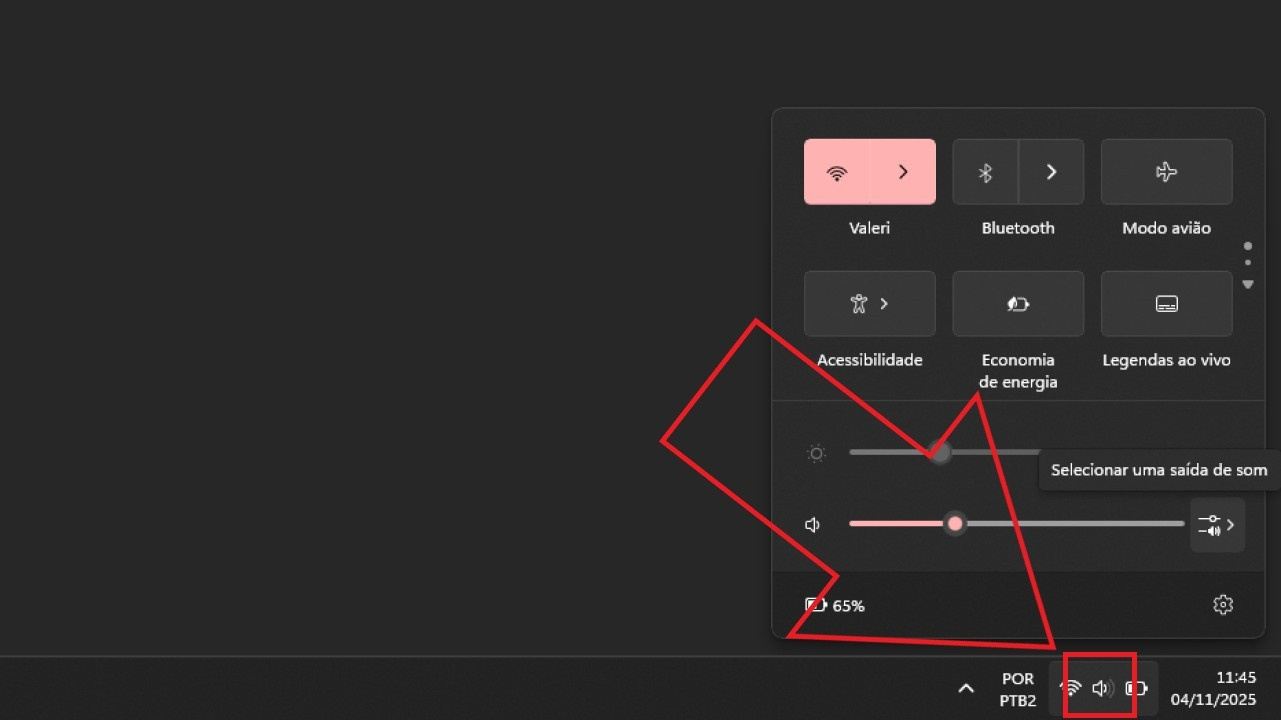
Step 01: Click the speaker icon in the lower-right corner of the screen.
Step 01 – How to Access the Windows Mixer (Audio Controller) to Configure the Default Audio Format (Image: Vitor Valeri/Hi-Fi Hub)
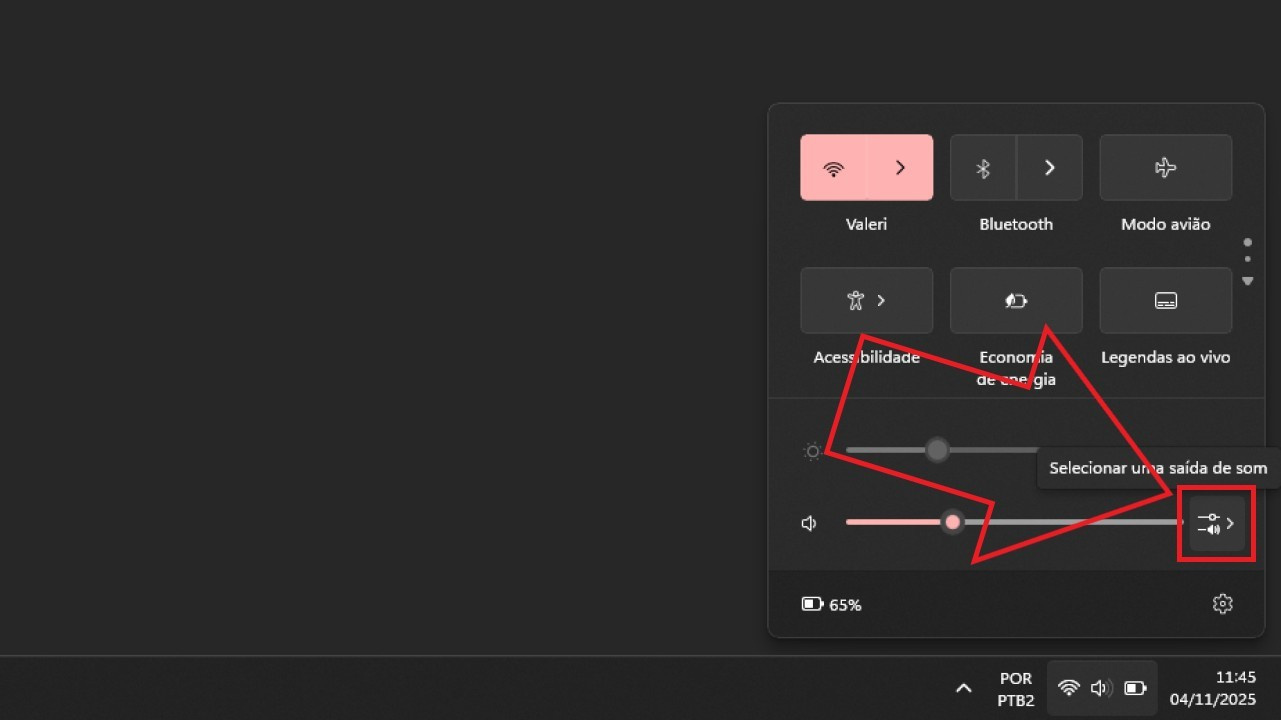
Step 02: Select the two parallel lines icon next to the volume bar.
Step 02 – How to Access the Windows Mixer (Audio Controller) to Configure the Default Audio Format (Image: Vitor Valeri/Hi-Fi Hub)
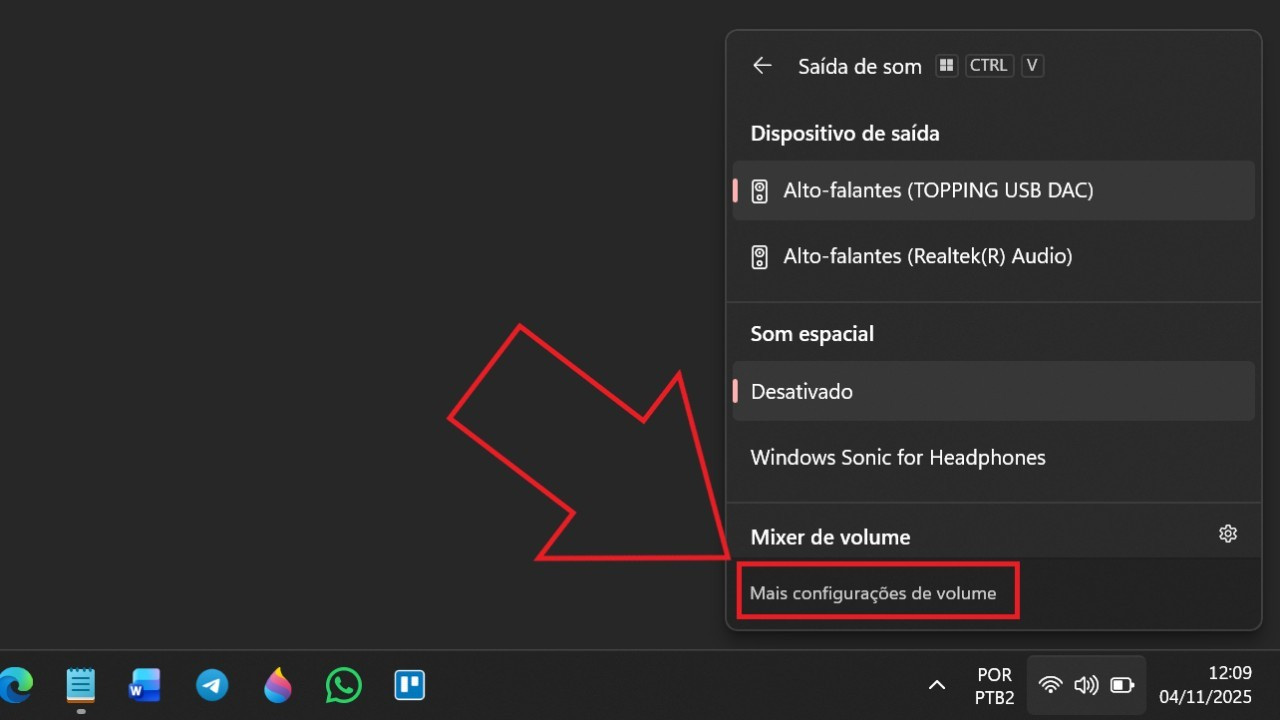
Step 03: Click “More volume settings,” located just below the “Volume mixer” section.
Step 03 – How to Access the Windows Mixer (Audio Controller) to Configure the Default Audio Format (Image: Vitor Valeri/Hi-Fi Hub)
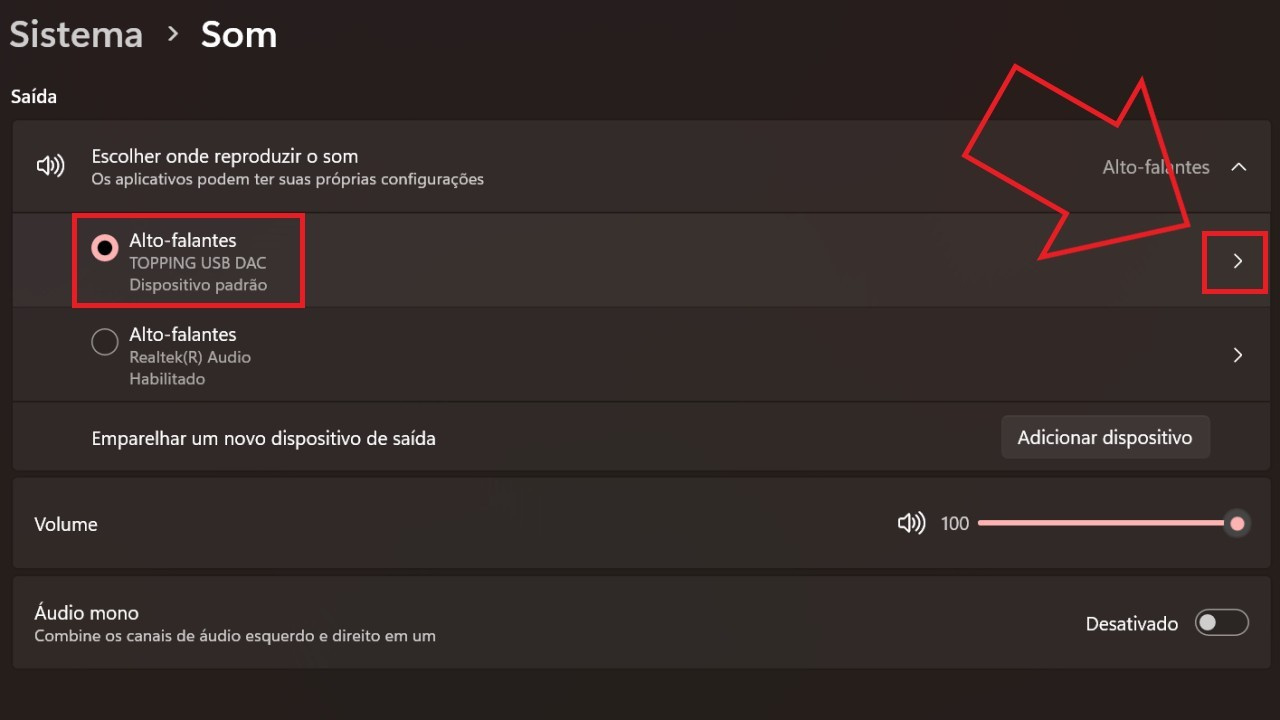
Step 04: In the “Output” section, locate the name of your external DAC and click the arrow on the right.
Step 04 – How to Access the Windows Mixer (Audio Controller) to Configure the Default Audio Format (Image: Vitor Valeri/Hi-Fi Hub)
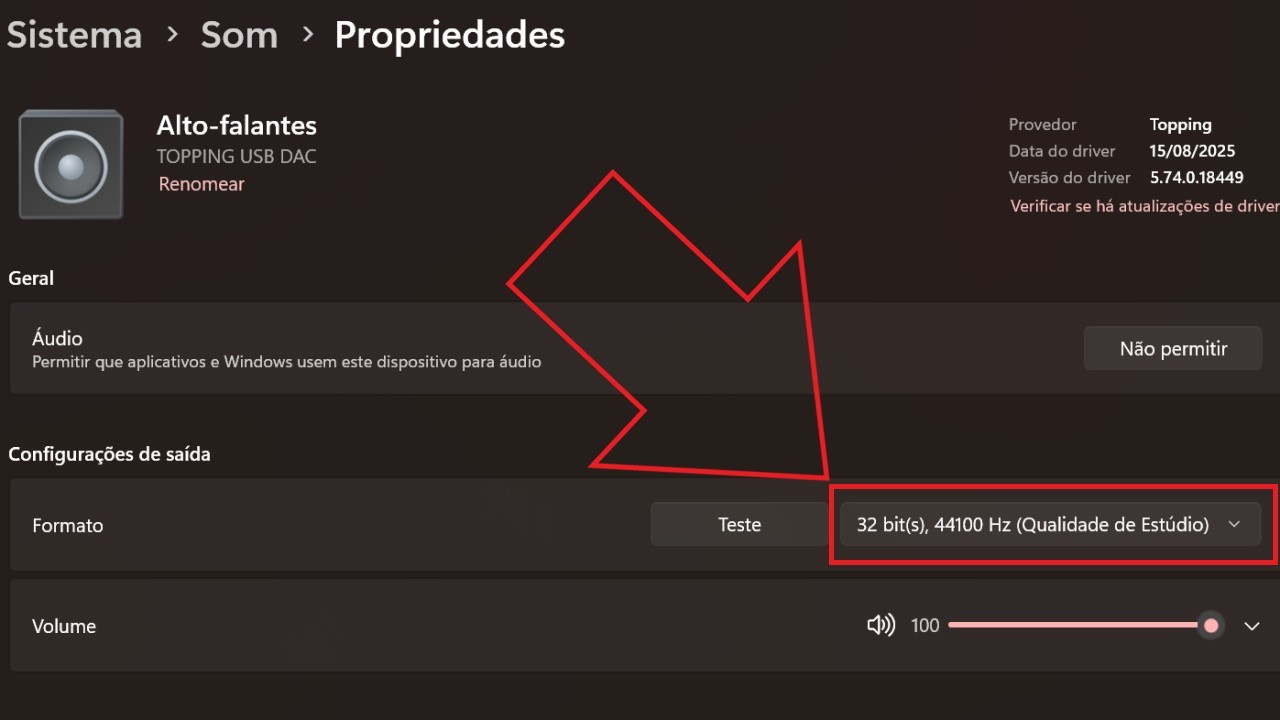
Step 05: Under “Output settings,” next to “Format,” click the bar displaying information similar to: “32 bit(s), 44,000 Hz (Studio Quality).”
Step 05 – How to Access the Windows Mixer (Audio Controller) to Configure the Default Audio Format (Image: Vitor Valeri/Hi-Fi Hub)
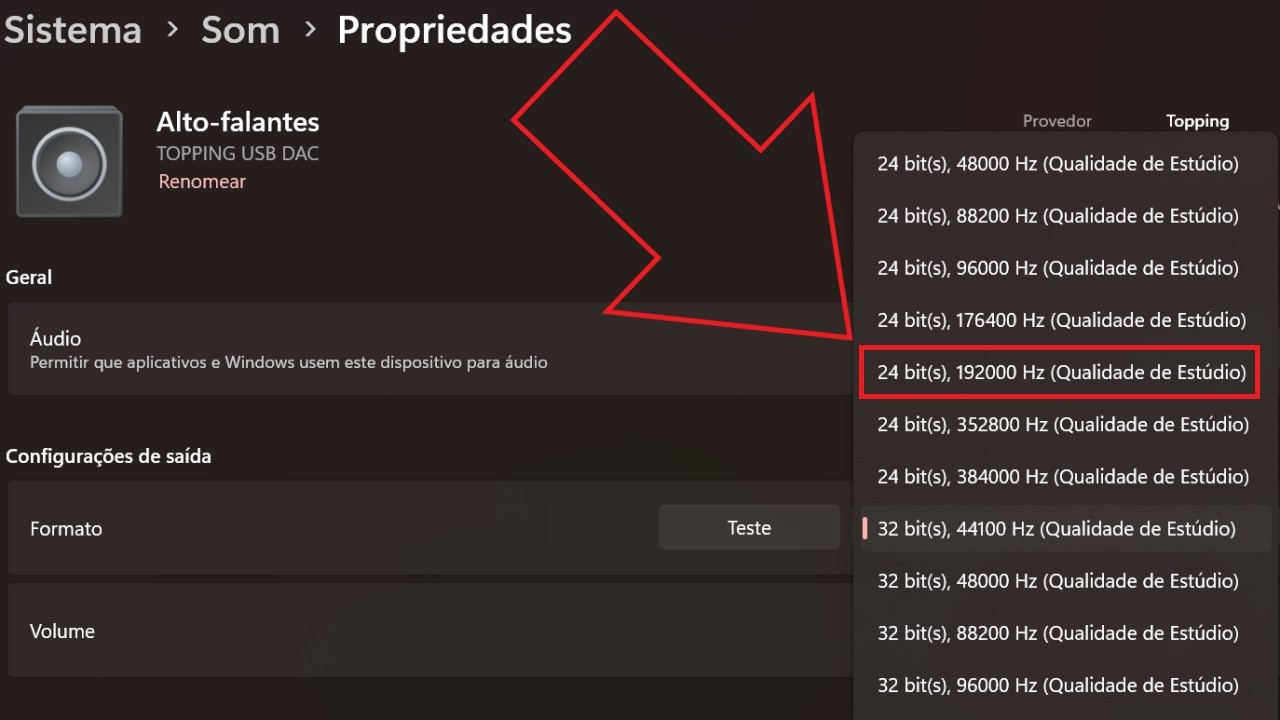
Step 06 – How to Access the Windows Mixer (Audio Controller) to Configure the Default Audio Format (Image: Vitor Valeri/Hi-Fi Hub)
You have now defined the format that Windows will use when sending audio data to the external DAC. Note that this configuration will only be followed by applications that do not offer exclusive access to the DAC.
Also known as “bit-perfect,” exclusive access allows an application to transmit audio data from the PC to the DAC without interference, preventing changes in volume, sample rate, and bit depth.
On Windows, only the music streaming applications Tidal and Qobuz currently allow direct connection to an external DAC, bypassing the operating system’s audio mixer. For local music playback, options include AIMP (Artem Izmaylov Media Player), Album Player, foobar2000, JRiver, Hysolid, and MusicBee.
Applications such as Spotify, Apple Music, YouTube Music, Deezer, and Amazon Music do not provide features that allow a direct connection to the external DAC while bypassing the Windows audio mixer.
The Windows mixer combines the audio from all applications running on the PC, forcing them to share the same volume level, sample rate, and bit depth.
What happens when I change the audio format in the mixer?
When you change the audio format resolution, for example, to 24 bit(s), 192,000 Hz (Studio Quality), Windows converts all application audio to that configuration.
If an application does not support the selected resolution, it may crash. Therefore, be careful not to select excessively high values. I recommend “24 bit(s), 192,000 Hz” because this is the maximum supported by all streaming services. If any application crashes, try reducing the values.
Additional configuration tips for external DACs
Some external DACs can function as preamplifiers and feature more than one analog output. More affordable models usually provide only RCA outputs and may not include preamplification functionality.
If your DAC includes a preamplifier control feature, useful for connecting it to active speakers or power amplifiers, it is advisable to keep this function enabled. This allows you to attenuate the voltage (V) sent to the amplifier. However, if you prefer to control volume through a headphone amplifier, it may be beneficial to disable preamplification and allow the DAC to operate at its maximum output voltage.
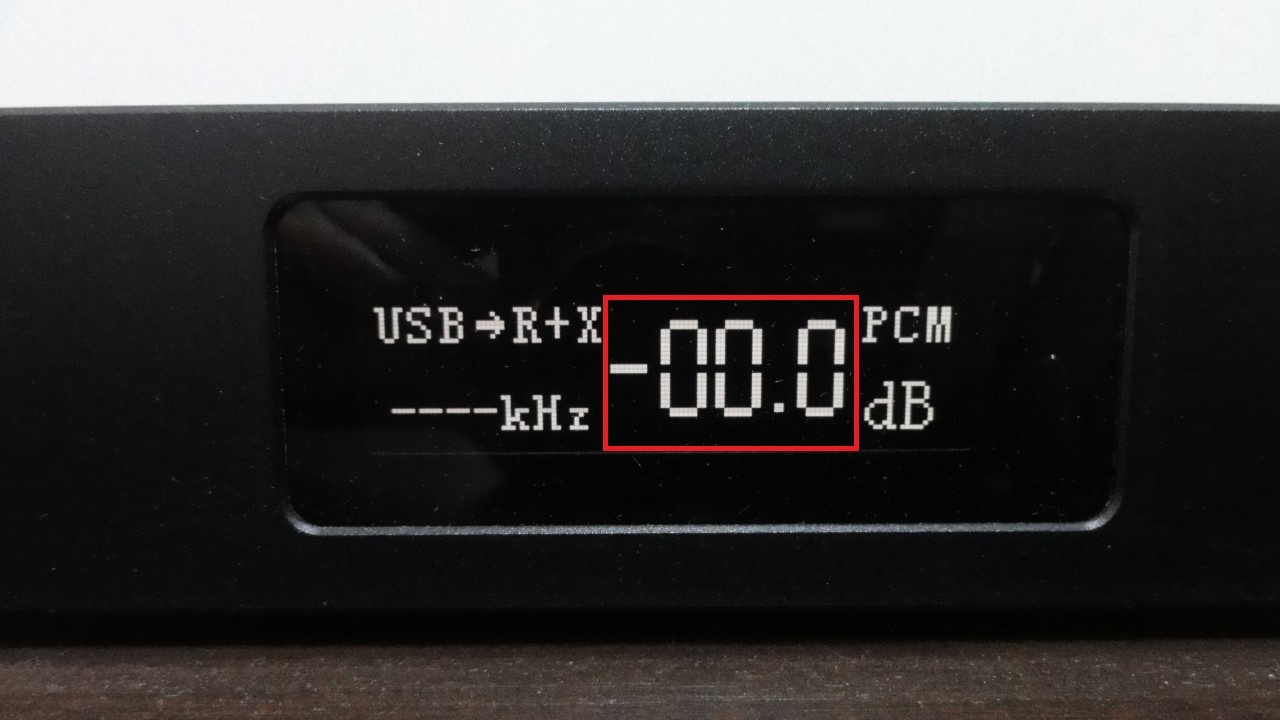
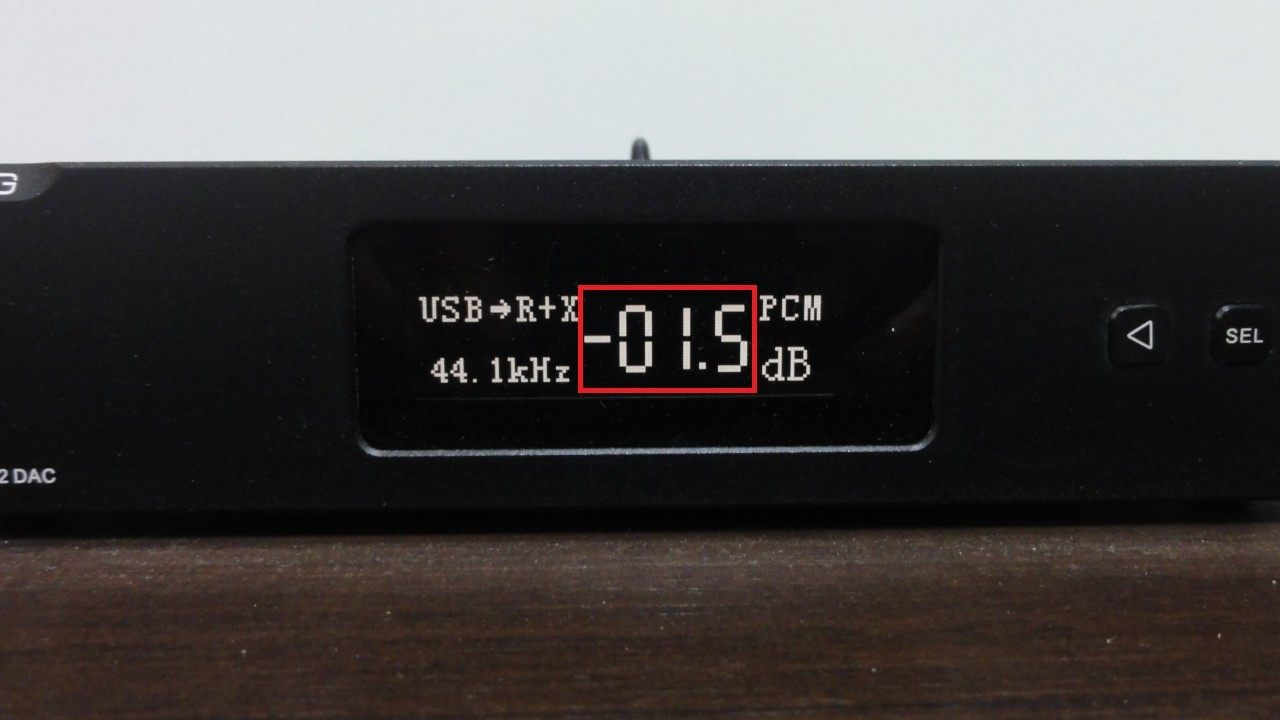
When preamplifier control is enabled, you will see a value such as 0.00 dB. At this point, there is zero voltage attenuation, meaning the output is at its maximum level (for example, a maximum preamplification of 2 V on the RCA output).
Preamp Control on the Topping D70S DAC (Image: Vitor Valeri/Hi-Fi Hub)
When you press the button to reduce preamplification, a value such as −1.05 dB will appear. This indicates that the voltage being sent to the amplifier is being attenuated, similar to reducing volume through the DAC (for example, a preamplification level of 1.5 V on the RCA output).
Attenuating the Preamp Voltage (V) on the Topping D70S DAC (Image: Vitor Valeri/Hi-Fi Hub)
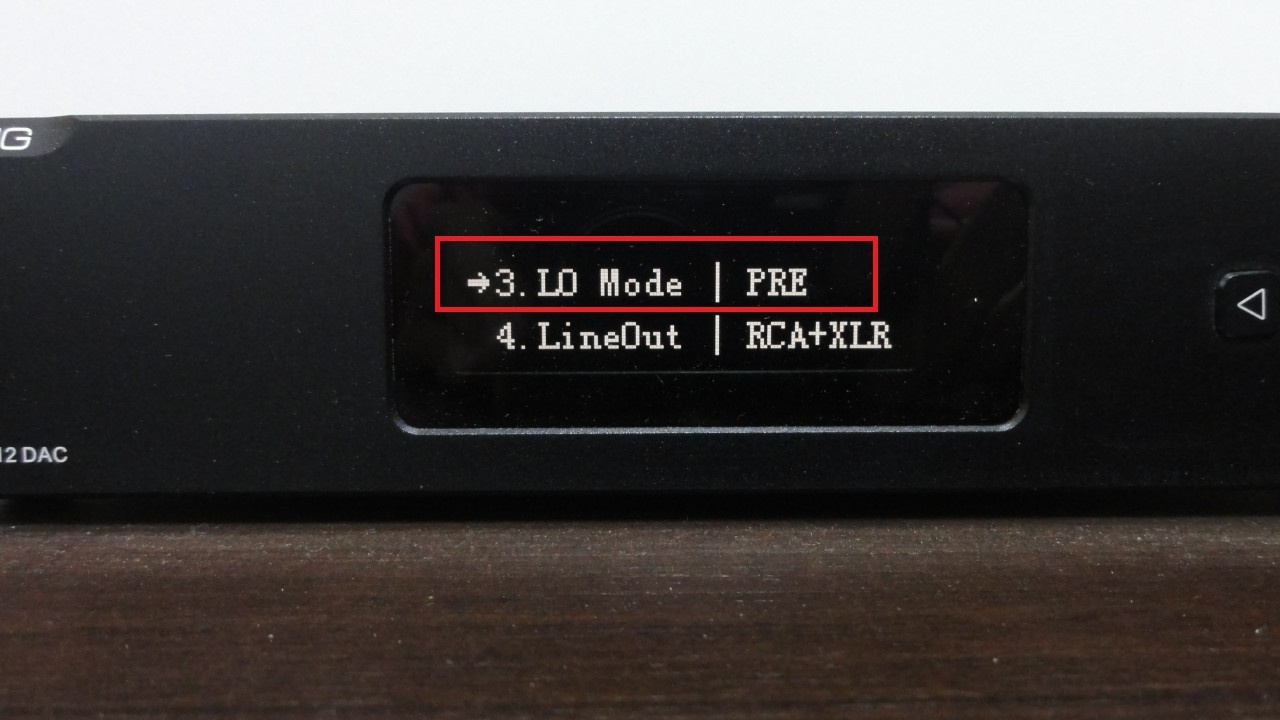
Each DAC has its own method for enabling and disabling preamplification. Below is an example image of the menu from the Topping D70S DAC.
Enabling Preamp Mode on the Topping D70S DAC (Image: Vitor Valeri/Hi-Fi Hub)
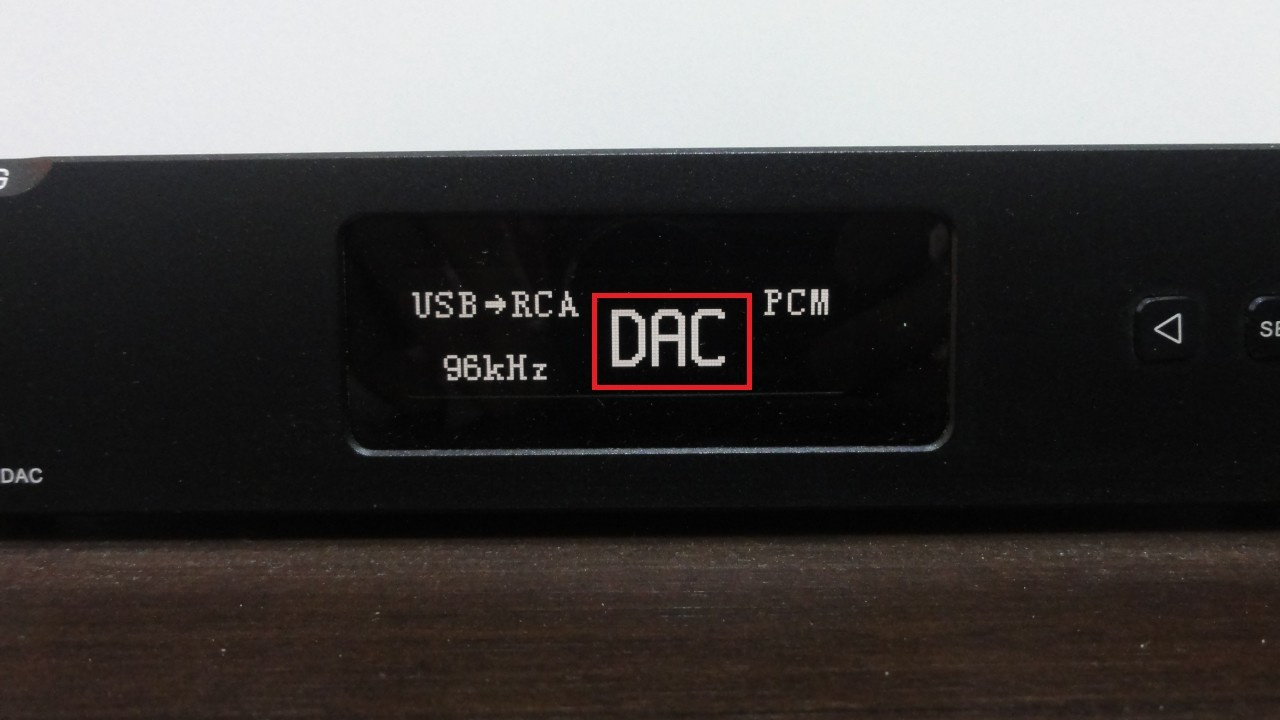
I usually keep the D70S in DAC mode because I use the amplifier to control volume and want the DAC’s preamplification set to the maximum level the device can provide. In this mode, the display shows the word “DAC” instead of −0.00 dB.
DAC Mode Enabled on the Topping D70S (Image: Vitor Valeri/Hi-Fi Hub)
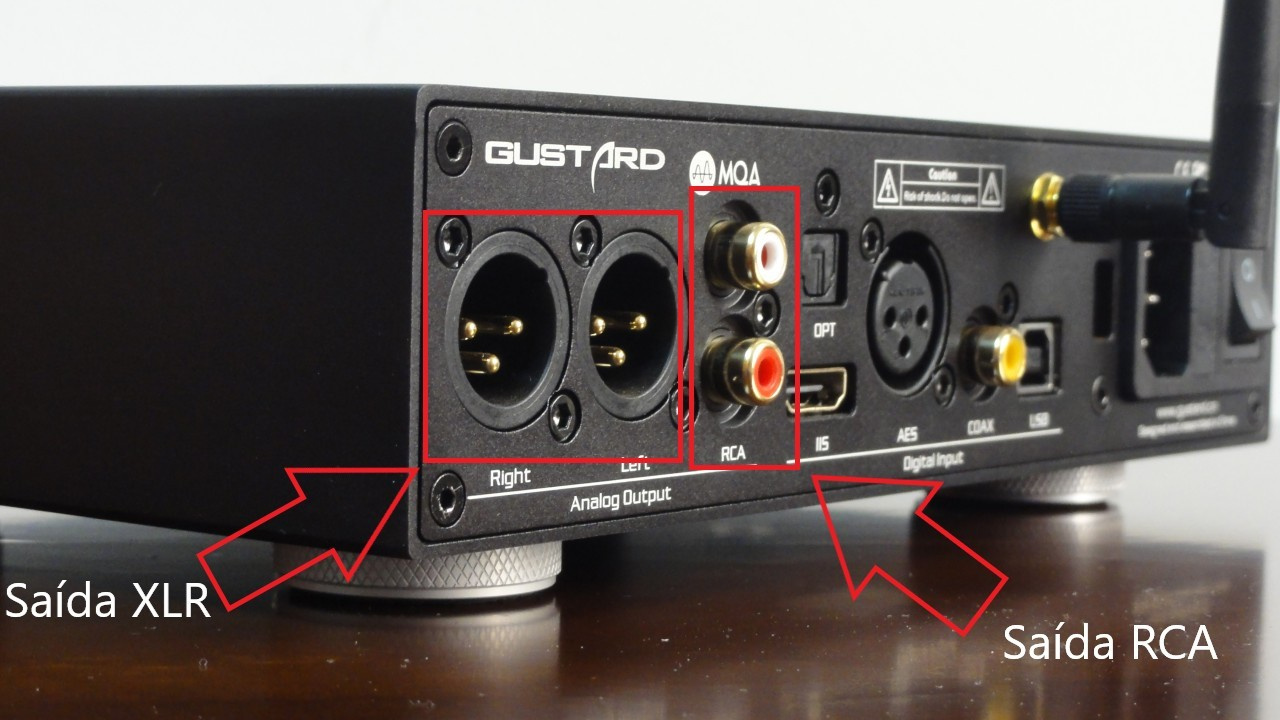
It is possible to use two outputs simultaneously on a DAC if it includes both RCA and XLR outputs. If, for example, you are not using the XLR output, in some cases you can disable it and leave only the RCA output active. This allows an increase in the maximum preamplification level of both the RCA and XLR outputs on the D70S, from 2 V to 2.5 V and from 4 V to 5 V, respectively.
XLR and RCA Outputs on the Rear of the Gustard X16 DAC (Photo: Vitor Valeri/Hi-Fi Hub)
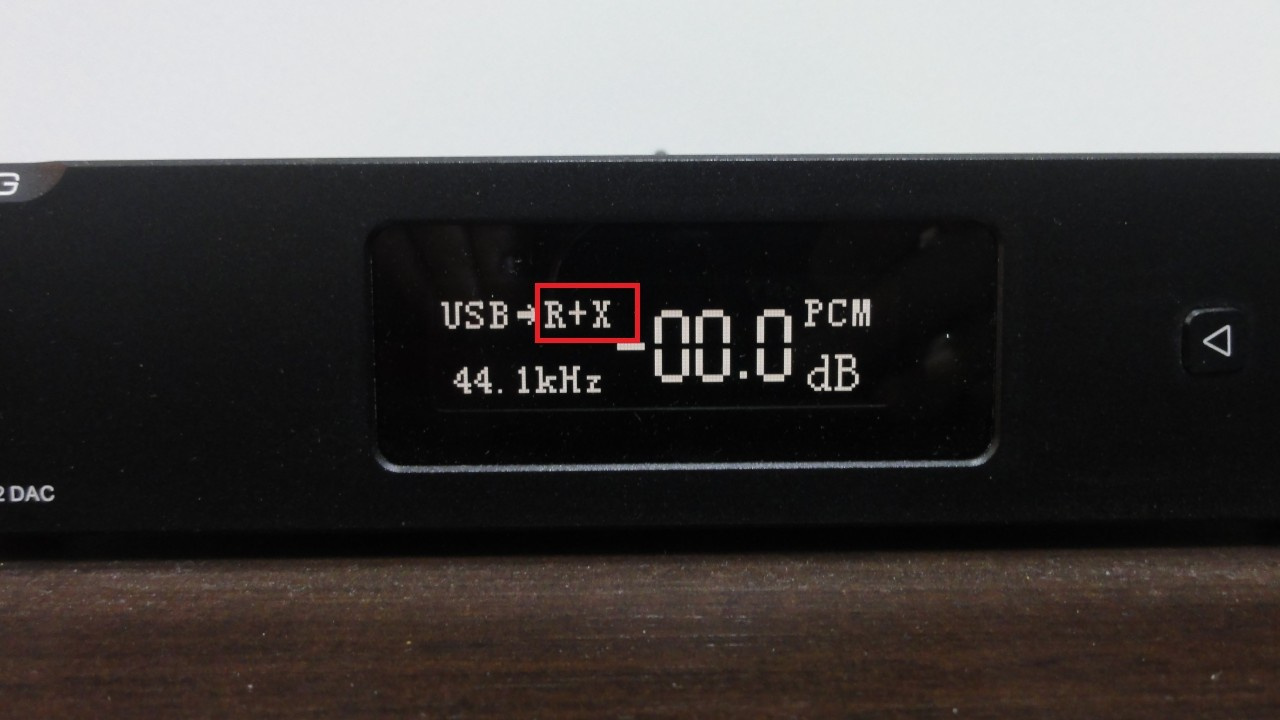
When both RCA and XLR outputs are used simultaneously on the D70S, the display shows “R+X” next to the currently selected digital input. In this case, the USB input is being used, but it could also be optical, coaxial, or another available input.
RCA and XLR Outputs Used Simultaneously on the Topping D70S DAC (Image: Vitor Valeri/Hi-Fi Hub)
Conclusion
These configuration tips for external DACs on Windows PCs can help slightly improve the audio playback experience. However, each user has a solution that best fits their needs, making it important to choose DACs with features and connections that are appropriate for your specific use case. If you have any questions or suggestions, feel free to leave a comment below.
Excelente guia para novatos y usuarios que aún no saben cómo afinar su Windows para optimizar el uso de un DAC Externo.
Excellent guide for novices and Windows users that explains how to tweak audio output settings.
Forgot to mention to disable all audio "enhancements".....